Staff teaching on Blackboard courses can use the Messages tool to send messages to their students, and these are often sent by email.
Because of the way that the Message tool works, all messages are sent from the e-learning support email address (bb-team@aber.ac.uk ), rather than the staff members’ personal email addresses. Replying to a Message sends it to our e-learning support staff.
Students – please don’t click the Reply button to respond to a Message. Instead, use the Forward option, adding in the relevant email address for the staff member. If you aren’t sure what their email address is, you can find it on the University Directory.
Staff – to help students get back in touch with you, we recommend including your email address in any Messages you send.
This is an example of a Blackboard Message sent via email
And the image below shows what happens when you click on the Reply button in your email – the To: box sends the message to bb-team@aber.ac.uk
We are working with Blackboard / Anthology and colleagues to resolve this issue, but in the meantime please check before replying to a message. This is especially important if you are sending personal information.
The Learning and Teaching Enhancement Unit would like to highlight four enhancements to Instructors from the October Blackboard Learn Ultra.
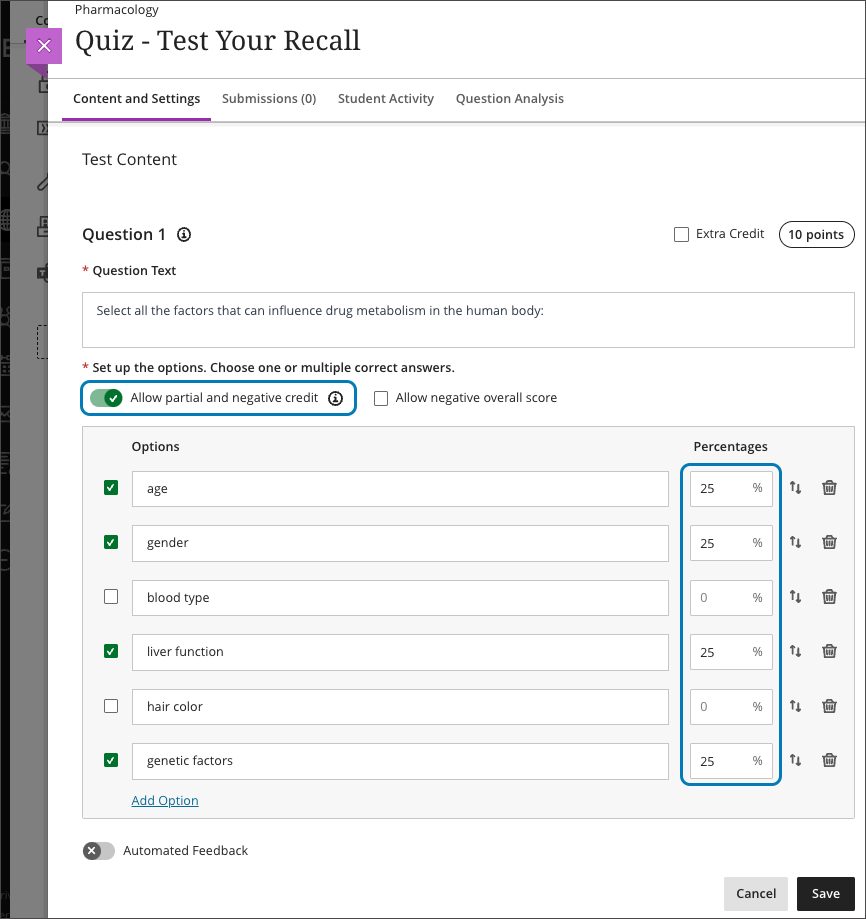
1. Partial credit auto-distribution for correct answers for Multiple Choice questions
Multiple-choice questions with more than one correct answer are valuable assessment tools. Also known as multiple-answer or multiple-select questions, these questions assess comprehensive understanding. They also promote deeper learning and higher-order thinking skills.
Some instructors wish to award partial credit for these question types. This practice awards students who have a partial understanding. It also fosters a positive learning experience.
In the past, instructors had to enter a value for partial credit percentage for each option. Now, Blackboard will auto-distribute partial credit across correct answer choices. This distribution provides efficiency and saves instructors’ time. If desired, instructors can edit the values if some correct answer options warrant more or less credit. Values for correct answers must sum to 100%.
Image below: Question credit auto-distributes across correct answer options; values can be edited.
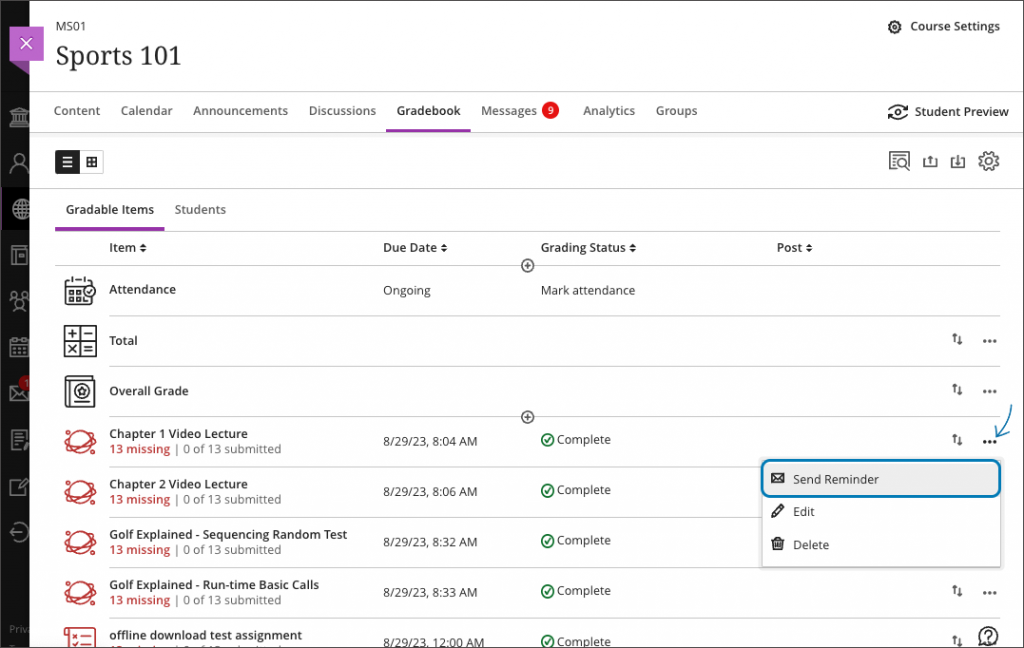
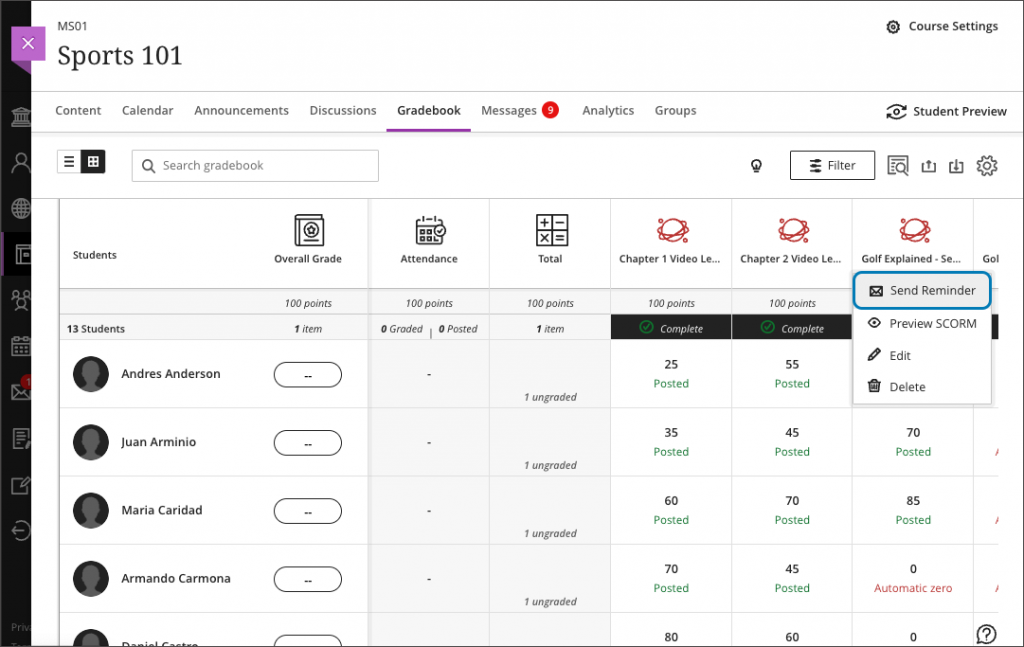
2. Send reminder from gradebook list and grid views
Instructors may want to send a reminder to students or groups who haven’t yet made a submission for an assessment. To make this easy, Blackboard have added a “Send Reminder” option to items in the Gradebook.
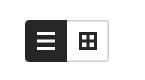
There are two views of the Gradebook that can be toggled between using the button. List view and grid view.
Image below: Use the list view and grid view button to toggle between views.
From the Gradebook list view, the option to send a reminder is in the overflow menu (three dots).
Image below: Send Reminder option from list view
Instructors may access the “Send Reminder” option in the grid view by selecting the gradebook column header.
Image below: Send Reminder option from grid view
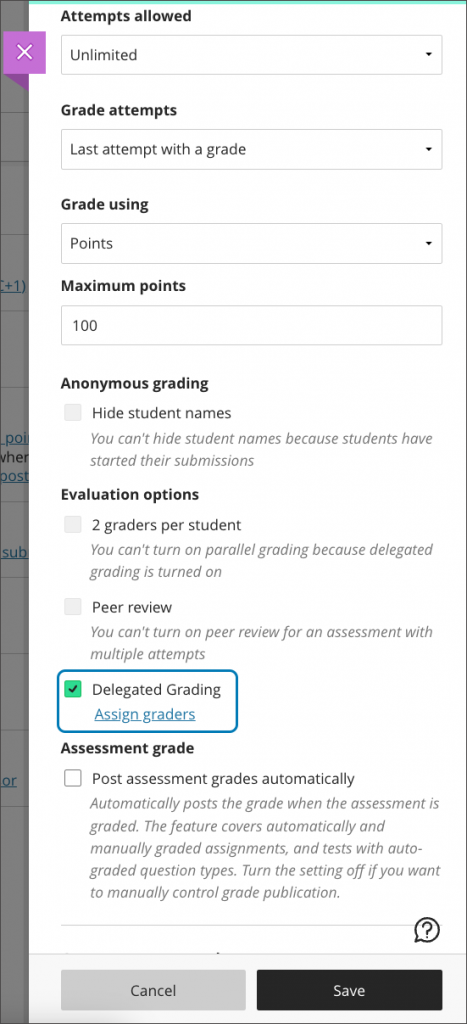
3. Delegated grading distribution by group membership
Instructors sometimes distribute the grading workload for an assessment to multiple graders. This is a popular practice in larger classes. Instructors can assign graders to groups of students with the new delegated grading option. Each grader will only see the submissions made by students in the group(s) assigned to them.
Delegated Grading can be used with all available group types. This first release of Delegated Grading supports assignment submissions from individual students. Tests, group assessments, and anonymous submissions are not supported at this time. These will be released at a later date.
After selecting the Delegated Grading option, select the appropriate Group Set. Instructors can assign one or more graders to each group in the group set. If multiple graders are assigned to the same group, they will share the grading responsibility for the group members.
Graders assigned to a group of students will only see submissions for those students on the assignment’s submission page. They can only post grades for their assigned group members. Any unassigned instructors enrolled in the course will see all student submissions on the assignment’s submission page. They also post grades for all students.
Note: At least one Group Set complete with Groups must be present in the course before using the Delegated Grading option.
Image below: Instructor view of the assessment Settings panel with the Delegated Grading option enabled.
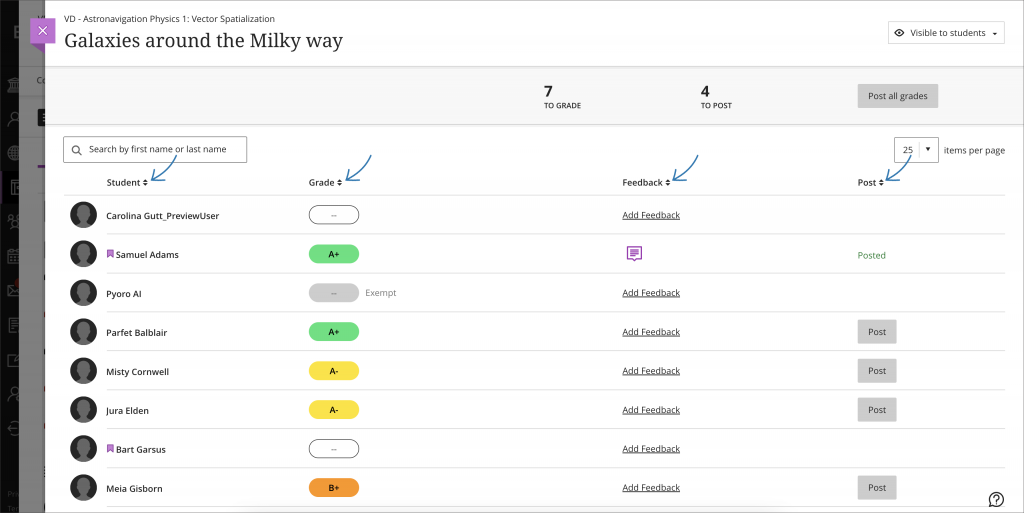
4. Sorting for manually added gradable items.
Sorting controls help instructors organize and find information in the gradebook. Instructors can now use sorting controls on the grades page for manually created items. The sorting controls enable sorting in both ascending and descending order. Instructors can sort the following information:
Student name
Grade
Feedback
Post status
The applied sorting order is temporary and resets when you leave the page.
Note: Sorting controls can be applied to one column at a time. When you sort another column, items will order according to the selected column.
Image below: Instructor view of sorting controls on the grades page for a manually added gradable item
When you next log in to Blackboard you may notice that the language of the interface has changed. The initial language you see in Blackboard is decided by the Preferred Language you have set in either ABW as staff or Student Record as a student.
If you have already set your Preferred Language to Welsh, you’ll see the Welsh language interface of Blackboard, and if you have set your Preferred Language as English, you’ll see the English language interface of Blackboard.
If you don’t see the Blackboard Interface in the language you prefer you can easily change it:
The new Blackboard Ally tool also gives you access to Welsh language audio versions of Welsh content in Blackboard courses. Any Welsh language documents, PowerPoints, PDFs etc can be read aloud using the Audio MP3 version. For more information on using Blackboard Ally, take a look at our staff or student FAQ.
This month saw the release of several further enhancements in Blackboard Learn Ultra.
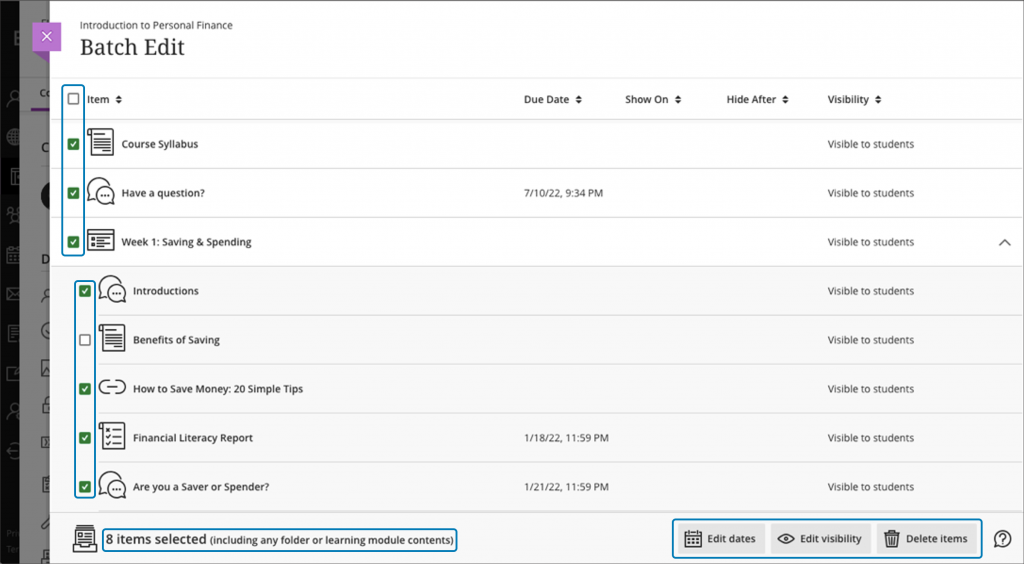
Batch Editor enhancements
Batch editing streamlines making changes to multiple items at once in Blackboard whether that is editing visibility, release conditions or deleting. Blackboard have updated batch edit so that actions now apply to all items inside of Folders and Learning Modules.
All items are now visible on a single page. Blackboard have added the ability to expand and collapse Folders and Learning Modules.
As we covered in a previous blogpost, Instructors can now search the extensive Unsplash stock image library for high-quality, royalty-free stock images to use within Blackboard.
This month also saw us enable the Blackboard Ally accessibility tool that allows students to download alternative formats of content as well as accessibility checker for Instructors.
Some of the feedback that we’ve received regarding Blackboard Ultra Courses is that they are not as visually customisable as Blackboard Original Courses. Ultra is created with accessibility in mind which means that some of the features that we previously had, such as textured or coloured backgrounds and text that could result in low colour contrast are no longer available.
In this blogpost we’ll give you some tips that might help make your Blackboard Ultra Courses more visually appealing, including some brand-new features that arrived in the September release.
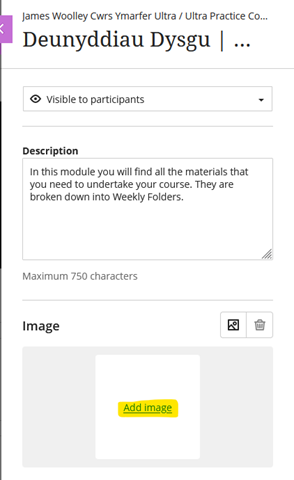
Learning Modules
Learning Modules work similarly to folders and can be placed on the top level of the Content Page. You can use these to arrange your Learning Materials. One of the developments that arrived recently is the ability to upload images to Learning Modules.
To create a Learning Module, click on the + and Create > Learning Module:
From there, you can Add image to upload an image from the file explorer. Select the image from the File Explorer that opens and upload. Alternatively, you can drag and drop your image into the Learning Module editor. Once you’ve added an image to a Learning Module, it will display as below:
In our previous blogpost we outlined some of the changes to Panopto with our move to Blackboard Learn Ultra.
In this blogpost we’ll outline the changes to using Panopto for Assignments. Panopto Assignments are used for students to submit a recording or presentation.
As part of this change, we recommend that you:
Create a Blackboard Assignment
Students submit via Blackboard Assignment and upload via the Panopto submission tool
The advantages to this new workflow are that:
The workflow for submission and marking is easier
Marks and feedback automatically go into the Gradebook
Students receive an email receipt for their submission
If you’re a busy bee preparing your courses before the students arrive and don’t have any time to attend training sessions, how about visiting our new bite sized training video clips on how to work in Blackboard Ultra.
If you’re unsure about how to do something specific in Ultra or just need a quick refresher then take a look at our bilingual training videos. Here’s a breakdown of the individual video clips:
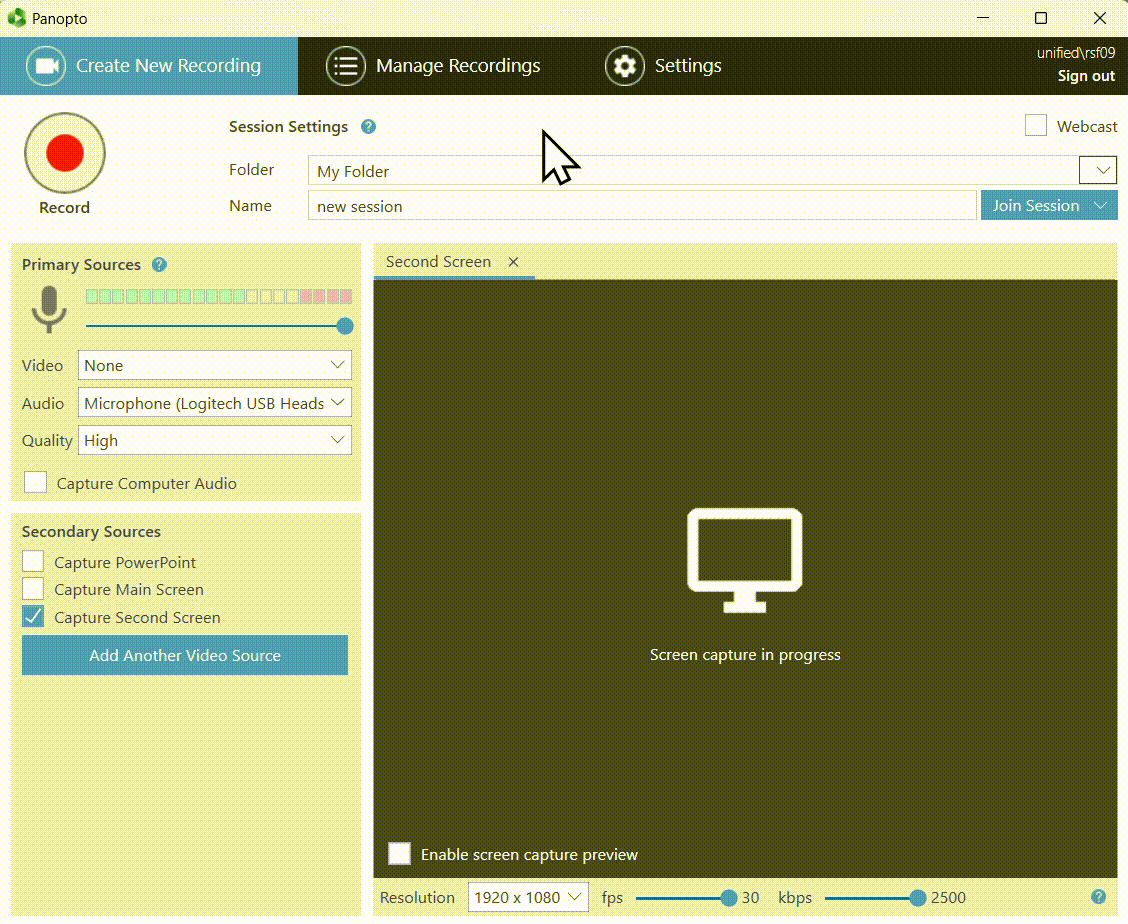
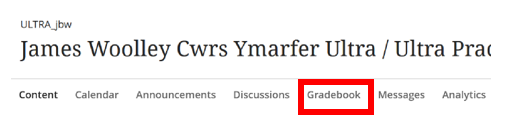
As part of the wider Blackboard Ultra project, our Panopto integration has been upgraded to work with Blackboard Ultra. This has provided us with an opportunity to make some changes and improvements.
Panopto folders are now organised by academic year.
Staff have frequently requested that the Panopto folders for their Blackboard Courses are organised by academic year rather than as a long list. The Panopto upgrade work gave us an opportunity to restructure our folders as requested.
Top level year folders will appear greyed out, but you still have access to your Panopto folders within.
When you open the Panopto Recorder in a teaching room:
You can either find the Panopto folder you want to record into via the folders or search for the Panopto folder you want to record into.
To find the Panopto folder you want to record into via the folders:
Click the dropdown button in the Folder field.
Double-click an academic year folder to expand it. or
Click the dropdown arrow to the left of the academic year folder to expand it.
Select the Panopto folder you want to record into.
To search for the Panopto folder you want to record into:
In the Folder field start typing the module code or name of the Panopto folder you want to Record into
Select the folder you want to record into.
Sharing Panopto recordings from Previous years.
To share Panopto recordings from previous years Panopto folders, copy the recordings into the current years’ folder of the course. This can be done via Panopto.aber.ac.uk. This grants all students enrolled on the current years’ course in Blackboard access to view the recordings. See this FAQ.
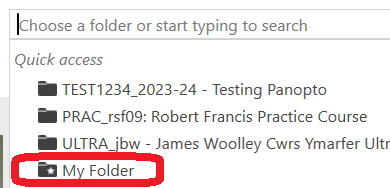
My Folder
Everyone now has a folder in Panopto called My Folder that they can record into. In the Panopto Recorder it can be found under Quick Access.
My Folder is useful for recordings that staff or students do not want to share with others immediately or when they cannot find a suitable folder to record into.
Recordings can be moved from My Folder into another Panopto Folder later. To copy or move a Panopto recording to another folder See this FAQ.
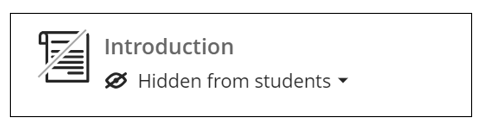
Now is a good time to check whether the content in this year’s Blackboard courses is visible to students. With our move to Blackboard Learn Ultra, any materials copied from previous years’ courses are hidden from students by default.
You can change the visibility of individual items (see Blackboard help site for making items available). You can make them visible immediately or use the Release Conditions (date/time, specific students / groups, student performance – see Blackboard help site for Release Content guidance for further information).
If you have a lot of hidden material, don’t forget that you can use the Batch Edit tool to make multiple items of content visible all at once (see Blackboard help site for using Batch Edit). Be careful not to make the External Examiners folder available.
When you use Batch Edit to make a folder visible it will also make all the content items in the folder visible.
Remember that you can use the Student Preview tool (see Blackboard help site for using Student Preview) to see how your course and content looks to students.
![[Alt text: screenshot of a Blackboard Message sent via email]](https://wordpress.aber.ac.uk/e-learning/files/2023/11/image.png)
![[Alt text: Screenshot of the email message created when you Reply to a Blackboard Message]](https://wordpress.aber.ac.uk/e-learning/files/2023/11/image-1.png)


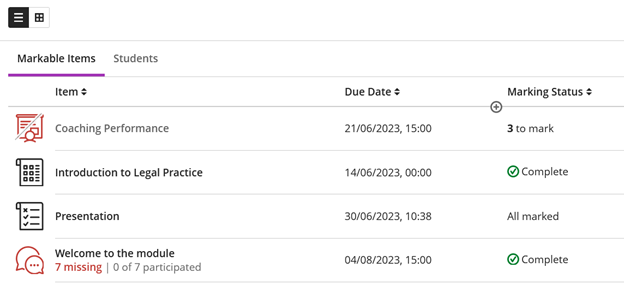
![Grid view of Gradebook]](https://wordpress.aber.ac.uk/e-learning/files/2023/09/image-19.png)