Panopto

As teaching starts, you may find this information about Panopto useful. These are the answers to our most frequently asked questions about Panopto over the last few weeks.

Linking to All Panopto Recordings

You can create a link to the Panopto folder in your Blackboard course. This means that students will be able to see the recordings for the course all in one place.

Finding your Panopto folder

Panopto folders for all this year’s modules are in the 2024-25 folder.

To find the Panopto folder you want to record into:

  • Click the dropdown button on the right-hand side of the Folder box.
  • Click the dropdown arrow to the left of the academic year folder to expand it.
  • Select the Panopto folder you want to record into.

You can also search for the Panopto folder you want to record into:

  • In the Folder box start typing the module code or name of the Panopto folder you want to Record into
  • Select the folder you want to record into.

What to do if you can’t see your Panopto folder

In a small number of courses, the Panopto folder wasn’t created over the summer. If you can’t find your Panopto folder using the steps above, you can create a folder from Blackboard:

  1. Login to Blackboard and find your course
  2. Click on Books and Tools > View course and institution tools
  3. Click on Holl Fideo Panopto / All Panopto Videos

You should then be able to find the Panopto folder to make a recording.

Vevox: University Polling Software

The University has a Vevox licence for all staff and students to use.

Vevox is Polling Software that allows participants to use their mobile devices to respond to questions.

In Semester 1, over 300 Vevox sessions ran, with over 10,000 participants and 1,500 polls.

In learning and teaching contexts, you can use Vevox to make your teaching more interactive, giving students the opportunity to reflect on their learning, respond to questions, provide ideas, and consolidate their understanding.

Vevox is not limited to learning and teaching activities. You can also use Vevox in meetings and outreach activities to canvas opinion, help with decision making, and give colleagues the opportunity to feedback.  

There are variety of question types available:

  • Multiple choice
  • Word cloud
  • Text Ranking
  • Numeric
  • Rating
  • XY Plot
  • Pin on image

You can also run surveys.

The Q and A feature gives colleagues the opportunity for their attendees to ask questions and for you to respond to them live in the session.

This feature is useful for classroom assessment techniques, such as muddiest point and revising key concepts.

With the Q and A function, participants can also upvote comments so you can address questions. This useful feature can also be used for external presenters and conference activities.

You can run analyses on your polls to see participant response.

As an institution, we have several case studies. See our previous blogpost on Vevox case studies.

If Vevox is new to you, then we have a training session on 26 January at 11:00 online via Teams. You can book your place via our CPD booking page.  

We’ve also got a webpage dedicated to Vevox.

All our previous Vevox updates are available on the LTEU blog.

If you’ve got any questions, then contact the Learning and Teaching Enhancement Unit (elearning@aber.ac.uk).

Retirement of AirServer

AirServer, the software used to connect mobile devices to teaching room equipment, is being retired.

Over increasing years, AirServer has been unable to cater for different types of mobile devices.

A workaround using Microsoft Teams can be used to link your tablet devices to teaching room equipment.

Take a look at our FAQ: How do I connect a tablet / mobile device to a teaching room machine?

If you have any questions, please contact Information Services (is@aber.ac.uk).

Panopto Update for Staff: September 2023

As part of the wider Blackboard Ultra project, our Panopto integration has been upgraded to work with Blackboard Ultra. This has provided us with an opportunity to make some changes and improvements.

Accessing Panopto

You can now access the Panopto server via Panopto.aber.ac.uk

Panopto Folders

Panopto folders are now organised by academic year.

Staff have frequently requested that the Panopto folders for their Blackboard Courses are organised by academic year rather than as a long list. The Panopto upgrade work gave us an opportunity to restructure our folders as requested.

Top level year folders will appear greyed out, but you still have access to your Panopto folders within.

When you open the Panopto Recorder in a teaching room:

You can either find the Panopto folder you want to record into via the folders or search for the Panopto folder you want to record into.

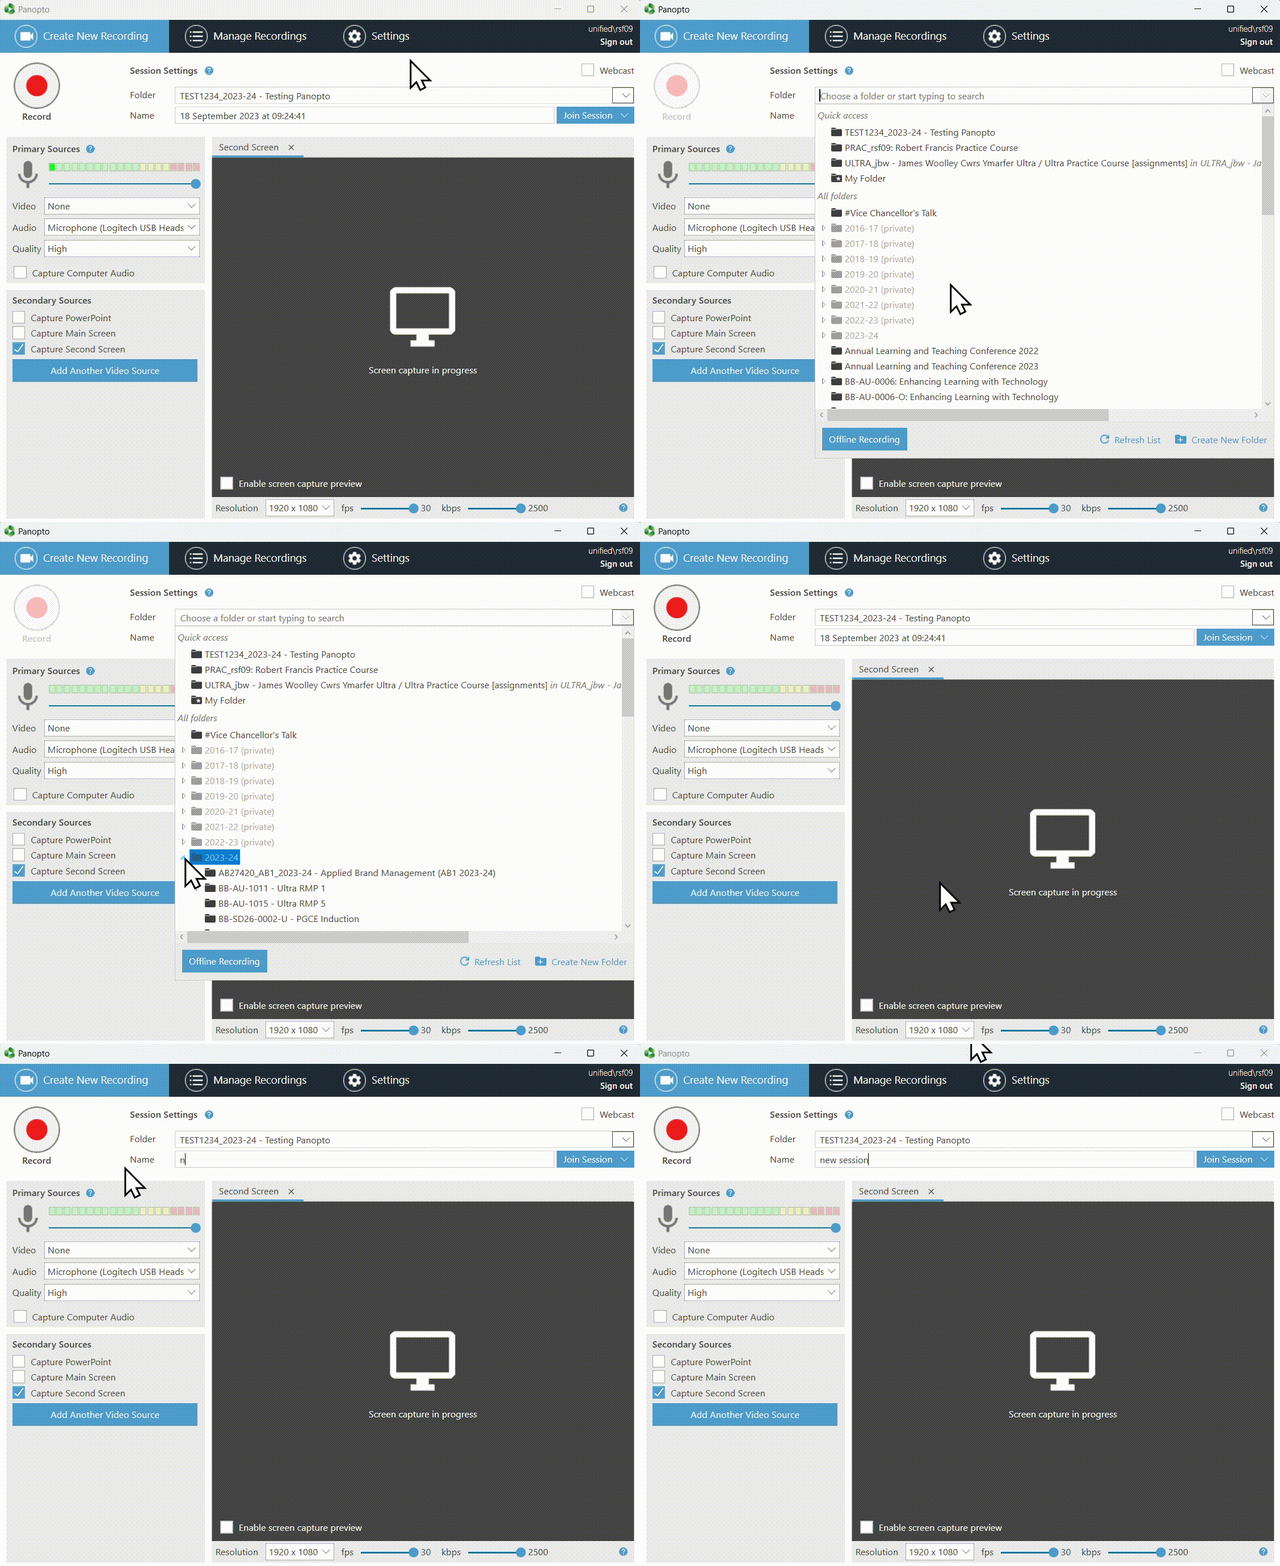
To find the Panopto folder you want to record into via the folders:

  • Click the dropdown button in the Folder field.
  • Double-click an academic year folder to expand it.
    or
  • Click the dropdown arrow to the left of the academic year folder to expand it.
  • Select the Panopto folder you want to record into.
An animated gif of accessing a Panopto folder in the Panopto Recorder.

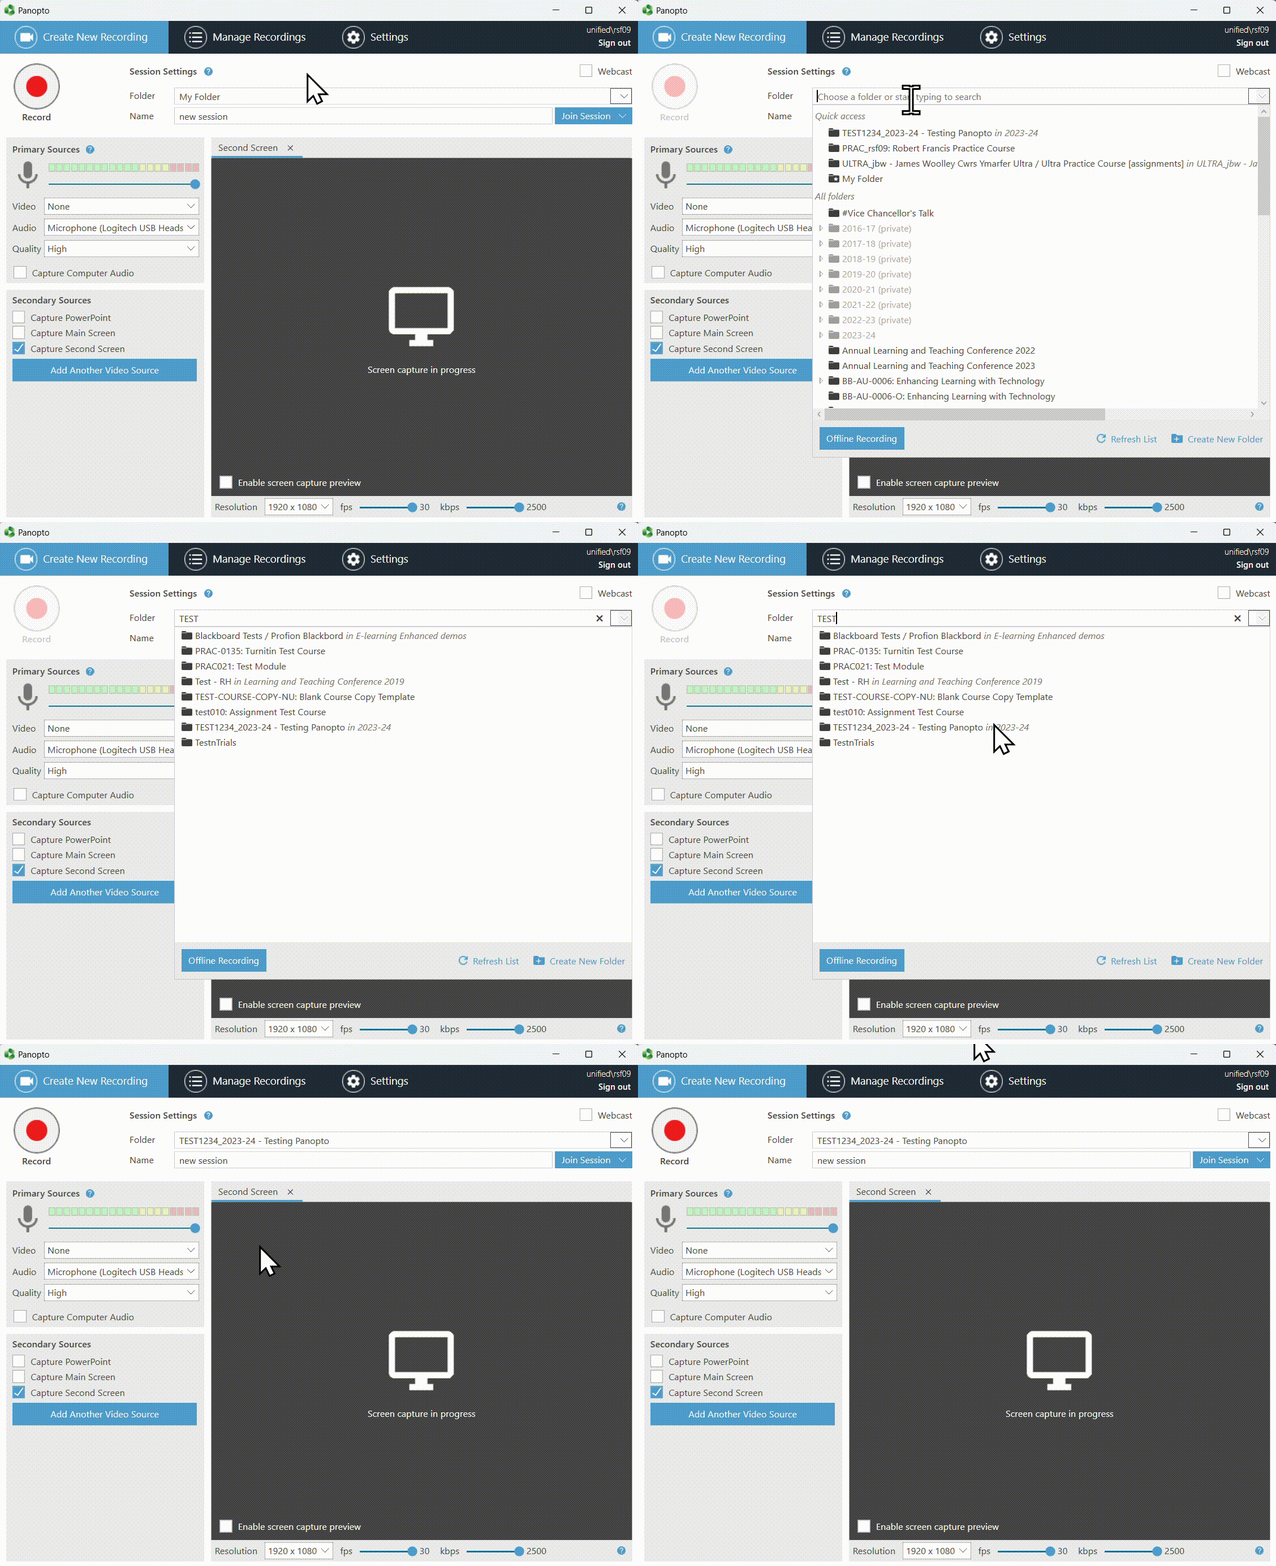
To search for the Panopto folder you want to record into:

  • In the Folder field start typing the module code or name of the Panopto folder you want to Record into
  • Select the folder you want to record into.
An animated gif of accessing a Panopto folder using the search function in the Panopto Recorder.

Sharing Panopto recordings from Previous years.

To share Panopto recordings from previous years Panopto folders, copy the recordings into the current years’ folder of the course. This can be done via Panopto.aber.ac.uk. This grants all students enrolled on the current years’ course in Blackboard access to view the recordings. See this FAQ.

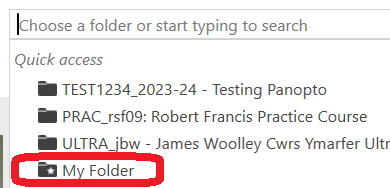
My Folder

Everyone now has a folder in Panopto called My Folder that they can record into. In the Panopto Recorder it can be found under Quick Access.

My Folder is useful for recordings that staff or students do not want to share with others immediately or when they cannot find a suitable folder to record into.

Recordings can be moved from My Folder into another Panopto Folder later. To copy or move a Panopto recording to another folder See this FAQ.

Changes to the Vevox PowerPoint Add-in

Vevox, the University’s supported polling tool, has updated its PowerPoint Add-in.

From September 2023, colleagues making use of the Add-in should use the updated version.

Please see our FAQ for how to use the new PowerPoint Add-in.

In our recent blogpost, we wrote about the new AI question generator.

If Vevox is new to you then take a look at our support materials and our previous blogposts.

We’ve also got a training session taking place on Monday 18 September, 14:00-15:00. This session is run by colleagues from Vevox. Book your place online.

Vevox is a great way to make your teaching interactive and further student’s learning.

Changes to Teaching Rooms: Re-introduction of Neck Mics

Information Services is working to re-introduce neck microphones in teaching rooms.

For those who are new to the institution or would like a refresher, neck mics are hooked up to the audio systems in teaching rooms, worn around the neck of the presenter, and can be used for Panopto recordings and Teams Meetings. Take a look at our FAQ on how to use the Neck Microphones.

Health and Safety Information

The reintroduction of neck microphones means that some additional hygiene guidance needs to be followed:

  • Regular hand hygiene helps to reduce transmission of illnesses and diseases; please wash hands regularly and use the hand sanitisers on entry to buildings.
  • To reduce contact points, only one person should use the neck microphone in a teaching session
  • The neck microphone should be wiped down with wipes effective against COVID-19 as per other equipment before and after its use
  • Although the neck mic gives staff greater freedom to move around the teaching room, staff are encouraged to maintain physical distancing of at least 2 metres, where possible, and maintain good hand hygiene practices before and after handling the neck mics (as noted in the Aberystwyth University COVID Risk Assessment October 2021).
  • In most rooms, the lectern microphones will also stay in place and can still be used (provided staff stay near the lectern). In a small number of rooms, only a neck microphone will be available.

How will the rollout be managed?

Changes to the teaching rooms will be taking place gradually so you may notice the reintroduction of the neck mic imminently. All neck mics will be in place ready for the start of teaching in Semester 2.

Use the neck mic in Panopto

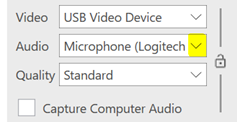
The neck mic can be used on your Panopto recording. When you start Panopto, change the microphone to Neck Mic by clicking on the dropdown menu to the right of the Audio field in the Panopto recorder:

Use the neck mic in Teams Meetings

The neck mic can be used as the microphone Teams meetings. To change your microphone in the Teams meeting:

Select the more options button:

Screen Grab of Teams Meeting Options

This screen grab shows the options on the top right handside of the screen available in a Teams meeting.

Highlighted is the ... option which stands for more options.

And then Device Settings

Under microphone select Neck Mic.

Further Help

We’ve got our Teaching Room Guide 2021-22 which outlines how to use the teaching room equipment. If you are having difficulties with the teaching room equipment in a centrally timetabled teaching room, pick up a phone and it will come through to the workshop.

Contact us if you have any questions (is@aber.ac.uk).

Support for Teaching In Person

As we look towards teaching in person again, we want to remind staff that they are not alone in re-adjusting to in-person delivery, which may yet face some changes with regards to group sizes, delivery modes, distancing, and masks.  

This blog post will address standard teaching room equipment and managing student expectations, and point staff in the direction of relevant resources for those topics. 

Standard Teaching Room Equipment 

Information Services has developed a guide to using the standard teaching equipment in the central teaching rooms. You can watch a playlist of teaching room equipment demonstrations

Enhanced hygiene and Health & Safety protocols may still be in place in September, so please keep up to date with them, including one-way systems in buildings, staggered arrival/ departure times for staff and students, sanitation stations, and seating plans. 

We also want to remind staff of the university’s lecture capture policy – returning to in-person teaching may require a return to live lecture recordings. Making lecture recordings will have a number of benefits as we return to face-to-face provision. Students unable to attend lectures because of illness will be able to catch-up with their work more easily. And if students know that lecture recordings are available, they can avoid in-person situations if they are feeling unwell. All this helps with work across the university to protect everyone’s health and wellbeing. 

If in doubt, revisit our playlist on Panopto. 

It may be that your teaching is not in a central teaching room, and other equipment than the central standard is available. Please make sure you are aware of the relevant risk assessments for your teaching spaces and check how to best implement them with the appropriate person in your department. 

Read More

Advice on managing face-to-face and HyFlex teaching successfully

Advice on managing face-to-face teaching successfully:
All staff should strive to maximise the amount of time that students are working back to back or side to side, wherever possible. However, where this is not possible, students may turn to one another, for example for seminar discussion, provided other mitigating practices remain in place (ventilation, masks, social distancing).

A short (10 minute) discussion among students can then be opened up by using interactive technologies such as polling software to allow students to pool their knowledge and begin a plenary discussion, for which all students will face forward again. The majority of in-person sessions should take place with students positioned back to back or side to side.

Please note:
• Any activities in which students face each other should be in very small groups (pairs or groups of three) to minimise the overall volume and ensure everyone can contribute.
• Reminding students of good conversational etiquette, in which people take turns to speak, is essential to minimising the volume of conversations, and thus the projection of aerosol droplets.
• In rooms with fixed and/or tiered seating, such discussion may prove difficult, as students are not permitted to change seats.
• In rooms with mobile seating, the layout of the room must not be changed, and staff must ensure that students maintain social distancing at all times when turning to others.

Advice on managing HyFlex teaching successfully:
• Set expectations clearly: what can student joining remotely expect? Will they be in an observer role? Will they be active participants? What are the limits of remote participation?
• Enable interactive tasks that bring remote and in situ students together, e.g. interactive polls that all can access synchronously
• If numbers are very uneven and the majority of students is present in one mode (e.g. only one student is joining remotely from quarantine), invite in situ students to the online session using their own devices, to enable peer discussion

Conducting blended teaching sessions – synchronously face-to-face and via Teams

Teaching staff are encouraged to provide access to teaching sessions for students unable to attend them in person. The guidelines below provide step-by-step checklist of all things that need to be completed to conduct an effective session for both students sitting in the classroom and those joining via MS Teams.  

Before the session: 

Note: Make it clear that this has been provided for students who are not able to attend the session in person and that all students who are well and not self-isolating are expected to attend the sessions in-person and that attendance during face-toface session will be closely monitored.  

  • Revise the teaching room guide and watch videos demonstrating using the new teaching room set-up:  

Teaching Rooms Guide 

Teaching Rooms demonstrations 

Read More

Changes to Teaching Rooms

Practice Modules

This blogpost is intended to take you through various scenarios that you may wish to use in Teaching Rooms. If you have any questions, please email is@aber.ac.uk.

The following changes have been made to teaching rooms:

  • There are now two screens in the teaching room. Screen 1 (the one with the web camera on) is the main screen. Screen 2 is directly linked to the projector. Use Screen 2 to display materials to your class and to share with participants via Teams.
  • Microsoft Teams has been installed and a shortcut is on all desktops.
  • New desktop microphones have been installed and lapel mics removed.

If you are in a teaching room and require technical assistance, pick up the phone and wait. It will automatically dial through to Technical Support.

Before the session we advise you to:

  1. Set up a Teams meeting for participants who are unable to join the session face to face (How do I do that?)
  2. Have the teaching materials easily available to you – we recommend you use OneDrive and copy your materials to the desktop before beginning the session. Avoid bringing USBs etc. into the teaching room. (How do I use OneDrive?)
  3. Communicate with any students joining via Teams how they will be participating in the session and how you will handle questions from them.

Read More