Emojis have become an essential part of how we communicate, and they can be fantastic for expressing our emotions with just a single character 🥰🤣🙄🤯😴
Most of us will be more familiar with using emojis on our mobile phones 📱, but there will be times when we’ll want to include emojis when using our laptops or computers 💻. Instead of googling for the emoji you need, why not access it directly from your keyboard!?
On both Windows and Mac, you can access your emoji keyboard in seconds by selecting:
Windows – Windows Key + “.” (period button/full stop)
Mac – CommandKey + Control + Spacebar
Watch the video below to see how this shortcut works on a Windows device.
Blogpost by Noel Czempik (Student Digital Champion)
Most of us engage with digital devices daily, and just like our physical spaces, they often become home to clutter, affecting our wellbeing and productivity. In this blog post, I will share the most effective strategies for reclaiming my digital spaces.
Preparing For Your Decluttering Journey
Try approaching your clutter with curiosity rather than judgment. This will help you stay positive and better understand your digital habits. Visualise the positive impact decluttering will have on your wellbeing.
Expect this process to take time. Sorting through years of accumulated digital content can be daunting, but sizing up the challenge and allocating the right time and space can make it more manageable.
Start with the quick wins that will make the most immense impact with minimal effort. This will allow you to build up momentum and approach the more difficult tasks with empowerment.
Consider any upcoming longer journeys as opportunities to make progress on your decluttering adventure.
Deciding what to keep and what to delete may be challenging. Ask yourself what would happen if everything were to disappear?
Quick Wins: Small Actions Can Yield Big Results
Each of these 5-10 minute tasks is beneficial alone, but as you progress through the list, their impact compounds for greater effect.
Cleaning your desktop: Delete unnecessary files and find a home for the rest to achieve the bliss of an empty virtual desk.
Decluttering your apps: You might be surprised at the number of apps on your phone or desktop that you no longer notice. Uninstall any apps you don’t use to free up space and minimise distractions.
Customising your home screen: Make apps that you want to use often more accessible and hide ones that are likely to distract you by using folders. Consider adding shortcuts to quickly access lists such as shopping, gift ideas or business ideas lists, preventing you from adding to the clutter with every stroke of genius.
Reviewing your notification settings: Disable unhelpful notifications to avoid overloading your lockscreen.
Customising your taskbar and quick access bars: Delete or unpin features you don’t find useful to implement your organisational systems.
Cleaning your downloads folder: Eliminate unnecessary files and duplicates to free up space.
Decluttering your browser: Remove unused extensions and bookmarks to streamline your browsing experience and pin the tools you’d like to use more often. Consider clearing your cookies and cache to protect your privacy, keeping in mind you might get signed out or remove saved preferences on some sites.
Clearing your screenshots: The screenshot folder is often a catch-all for single-use files.
Blogpost by Noel Czempik (Student Digital Champion)
In my journey to digital wellbeing, I found myself at a crossroads, dissatisfied with the evolving relationship between technology and me. Once a source of joy for facilitating connections and enriching experiences, it gradually became a frustrating and anxiety-inducing presence. Attempting various strategies, from greyscale displays to setting reminders, proved futile; my devices continued to dominate my time, now laced with guilt and a sense of personal failure, far from the fascination of my early experiences with technology. What had changed?
Swipe Wars: The Smartphone Menace
In the early days of social media, logging in required a ritual—turning on the family PC, navigating through desktop layers, and patiently awaiting the slow progression of the digital world. That world could disappear at the press of a button at dinnertime or the first signs of an oncoming thunderstorm. Fast forward to today, and our devices are ever-present, always in our pockets, ready for instant engagement. The ease with which we unlock our phones without a clear purpose has turned habitual, a craving for the dopamine reward that digital interaction brings.
Initially confined to finite feeds, social media has evolved into expansive content platforms crafted to hold our attention endlessly. In today’s consumer-centric landscape, our devices are not neutral tools but deliberately designed to encourage frequent and prolonged use. While we seek engaging technology, the allure that captures our interest can sometimes work against our best intentions.
From Whoville to Screensville: How the Smartphone Stole Christmas
While invaluable in connecting us during lockdowns and holidays spent at a distance, our devices have also altered the nature of our in-person interactions. I vividly recall the post-pandemic Christmas spent with family, surrounded by screens, each of us engrossed in our digital worlds. It was a far cry from the planned festivities but a reality shaped by the omnipresence of technology.
My once-positive relationship with technology has now turned toxic, and breaking free from my phone’s grasp requires more than just free will.
Blogpost by Joel Williams (Student Digital Champion)
Whilst computers can be excellent tools to increase and streamline a student’s productivity, staring at a screen all day can have several adverse effects. Through this post, and accompanying infographic, I hope to impart several tips which I’ve used to help make using computers a more enjoyable experience throughout my degree. In this post, I will discuss one common computer-related ailment, Eyestrain. Eyestrain can occur after extended periods of looking at the same monitor or by using a computer in a poorly lit environment.
20-20-20 Rule
One of the approaches I’ve found easiest to implement into my studies is the 20-20-20 rule; this approach involves taking a break every 20 minutes, looking at an object 20 feet away (don’t worry, this doesn’t need to be precise), for 20 seconds. Blinking often during this is also suggested, as this can help relax the eye muscles and further reduce the likelihood of strain.
Another method to reduce eye strain is to limit your exposure to blue light; this is because the blue light produced by screens can limit the production of melatonin (the sleep hormone), which can disturb our natural sleep cycles and result in our eyes feeling strained at the end of the day. This topic is still up for scientific debate, and you can read more about it here. This is easier to setup on personal machines but with some tweaking can be used on almost any computer at the University.
There are two main approaches to managing this:
Firstly, you can use software to reduce blue light exposure; MacOS and Windows have built-in settings, Night Shift and Nightlight respectively; you can even enable Nightlight on university computers.
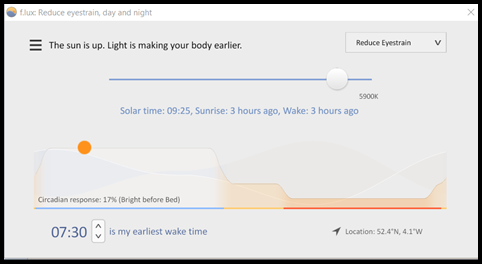
Secondly, most monitors and laptop screens have options which enable you to control brightness and contrast, enabling you to achieve a similar result. However, if you are looking for more customisation, you can use free programs like f.lux which works on MacOS, Windows & Linux, and can provide far greater control over the tone of the screen (shown below).
Finally, blue light glasses can also be used to filter light not only from your screen but also from the surrounding environment and can be purchased cheaply from several retailers.
Enabling Dark Mode
Finally, another strategy which works well on many of the programs I’ve used during my course to reduce eye strain is to enable dark mode; this can be done within both MacOS and Windows and both are designed to aid working in environments with poor ambient lighting.
However, programs like the office suite and some internet browsers will require additional steps to change. Steps to switch Office to dark mode can be found here, and you can convert any Chromium-based browser to dark mode using extensions found in the Chrome Web Store.
More information can be found within the Digital Ergonomics LinkedIn Learning collection, click on the image above or use the link here.
Our Christmas Learning Challenge begins tomorrow, Wednesday 6 December! We have put together 12 short videos from LinkedIn Learning for you to watch and learn from over the next 12 work days. This content ranges from 1-8 minutes and will help you to develop a range of skills – from tips to boost productivity, keyboard shortcuts in Outlook to developing better sleep habits.
If you have any questions about the challenge, or about LinkedIn Learning in general, please email the Digital Skills Team (digi@aber.ac.uk), and we hope you enjoy your 12 days of learning!
Blogpost by Joel Williams (Student Digital Champion)
To accompany a blogpost that I published last week on how you can use time management tools to help you master your schedule, I’ve created an infographic (text version below) which summarises some of the key strategies and tools that have worked for me.
Blogpost by Joel Williams (Student Digital Champion)
As module handbooks are released, work and deadlines can quickly feel overwhelming. In this post, I will show you some of the programs I’ve used to help take back control of my studies, which should aid you when managing your workload.
The first two programs, Microsoft–To-Do & Google Tasks, are relatively comparable and easy to use. However, this does sacrifice some of the features found in more complicated programs like notion.
Microsoft To Do
One of the most accessible programs to integrate into your studies is Microsoft-To-Do; at its most basic, it allows you to create tasks and then group these as needed. However, the reason this is usually my go-to is that you can also use it in conjunction with the Office 365 suite of programs, making it especially useful as the University already provides these (You can download these here).
I’ve found this especially useful during my studies as it shows any emails I’ve flagged, preventing me from forgetting about them. Therefore, I recommend creating an account with your university email, which helps keep it all interconnected. It is available on the Google Play Store, Apple App Store, and as a website.
Google Tasks
Another popular alternative is Google Tasks, which, as I stated earlier, is comparable to Microsoft’s offering. However, I’ve found it helpful because of its integration with Google Assistant, making it especially easy to set reminders and tasks quickly while working on something else.
Additionally, if you prefer using the Google suite of software over Microsoft or work on an Apple device, this program will likely be the best option. It is available on the Google Play Store, Apple App Store; you can access it within Google software on the Internet or as a Chrome plugin.
Other Helpful Programs
There are many alternative programs which can help with scheduling; one of the better-known ones is Notion, whilst it is worth mentioning there is a slight learning curve. However, the elements which make Notion hard to use result from the sheer breadth of options and customisation within the program, allowing you to tailor your own experience.
If you’re looking to plan out group work (but don’t want to use Notion), Microsoft Teams is likely one of your best options. Alongside being able to communicate as a group, you can also create a task tab, which allows you to set tasks to complete together as well as divide up tasks by person if needed.
Creating your own system
The critical aspect of using all of these programs is to find the one which can best integrate into your workflow, making sure that whatever option you choose is assisting, not hindering. For those who would like to view more detailed information about some of these programs, you can find a LinkedIn Learning collection here.
Do you find it easier to proofread a document or an email when you can hear what you’ve written? Luckily, there’s a useful function called Read Aloud that will play back written text as spoken words, and this is available in several Microsoft 365 apps, including Word and Outlook. It can read both Welsh and English text, in addition to several other languages. Watch the video below or follow these instructions:
The first step is to ensure that your text is in the correct proofing language. Highlight the text and select Review
Select Language, and then Set Proofing Language
Select your chosen language and then click OK
Navigate your cursor to the start of the passage you want to read aloud
Select Review and then Read Aloud
You can change the language and the voice of the playback
Do you need to brainstorm new ideas with your peers for a group assignment? Or perhaps you have a work project that you want to discuss new ideas for with colleagues? The whiteboard in Microsoft Teams is a fantastic tool for this and provides you with a range of templates to choose from.
Watch the video below to learn how to get started, or please click on this link if you wish to view the below video with closed captions.
We’ll also be showing how to use the whiteboard during our Mastering group work with online tools and strategies session this afternoon (7 November, 15:00-16:00)as part of the Digital Skills Festival! You can join this session directly from the festival programme.
If you need to include a screen-recording in your PowerPoint presentation, you can do this directly in PowerPoint without having to use any other software! Open PowerPoint and then watch the video below or follow these instructions:
Select Record
Select Screen Recording
Open the page that you want to record
Click on Select Area and choose the exact part of the screen that you want to record
Select Audio if you want to record audio with your video
Select Record (you should see a countdown before your recording starts) and complete your recording
Once you’ve finished your recording, hover your mouse over the top of the screen and select Stop
Your screen-recording will be automatically pasted into your PowerPoint presentation
You can edit your recording by clicking on your recording and selecting Playback