
Blogpost by Jeffrey Clark (Student Digital Champion)

Making things easier
Microsoft Word is perhaps the most used and widely recognized computer program in all of academia. Virtually every course you can take at Aberystwyth University uses Microsoft Word to some degree, with some courses requiring you to do more with it than just type out an essay. In this blog post, I’ll tell you about some shortcuts in Microsoft Word that have helped me during my studies.
Tip 1: Keyboard shortcuts
Keyboard shortcuts are a combination of keys that you press to perform a function. For example, press control (ctrl) and C at the same time while highlighting text copies that text onto your clipboard. Instead of right-clicking and scrolling down the drop-down menu to ‘Paste’, you can press ctrl + V to paste the text instead.
The ALT key can also be used for shortcuts. Specifically, the ALT key is used for shortcuts as they relate to the top task bar. By holding down the ALT key for a few seconds, the keys for each shortcut will pop up. For instance, on my keyboard, pressing ALT and 2 will save my document.

But if we press ALT + S to go to the References tab…

We get an entirely new set of ALT keyboard commands to use!
By holding down the ALT with a different tab open we can see what shortcuts are available for each tab on the taskbar. If you forget what ALT key shortcuts do, holding the ALT key down will give you a helpful reminder of your keyboard shortcuts!
Tip 2: Adding headers and footers to your document
Headers are text that appear at the top of every page in your document, while footers appear at the bottom of each page in your document. This feature is useful for adding material that you want to be seen on every page. Some examples of this kind of material include your name, a signature, or an image. To add a header or a footer click on Insert and select Header and Footer.

From there, you can pick between a handful of options but for now we’ll pick the Basic Header option…

From here, you can type whatever you wish to appear at the top of each page in your document or add a desired image. The grey text below is text that is already in the document and is unaffected by the header text. The footer text will appear at the bottom and can be changed in the same way.
Tip 3: Using the ‘read aloud’ function
The last thing anyone wants to do is proofread their assignment after a long day of writing. Thankfully, you can make proofreading just that little bit easier by using the read aloud function. This function allows Microsoft Word to read your text aloud, both in Welsh and English, which is useful for reviewing your work. Here is how it works:
- Left click in front of the text you would like Microsoft Word to read.
- Navigate to the top taskbar and click Review followed by Read Aloud.

You should start hearing your text being read aloud to you and a small taskbar should appear in the right-hand corner. This taskbar gives you options to pause your reading, skip to the next paragraph or go back to a previous paragraph, and change the reading speed.
Tip 4: Checking your word count
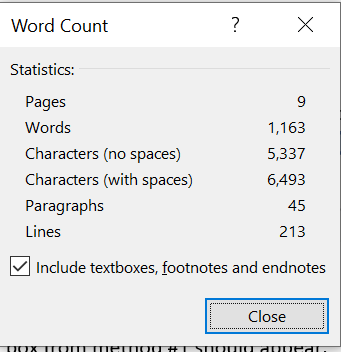
Microsoft Word keeps a tab of how many words and characters are in a document. There are two ways of checking your word count, from the bottom task bar and the review tab.
Method 1) The bottom task bar contains elements such as the page count, the proofing language of the document and an active word count.

Clicking on this word count brings up a dialog box which provides more detailed statistics of your document.
Method 2) The review tab
- Click on the Review tab on the top taskbar, then click on Word Count.
- The word count dialogue box from the first method should appear.
Tip 5: Inserting and using hyperlinks
A hyperlink is a way to embed a link within a word or sentence in your document. Hyperlinks are often used by websites to link to further information, such as in an article. They are incredibly useful in keeping your document tidy and helps users navigate through your document more easily.
Thankfully, you can insert a hyperlink in Microsoft Word in just a few simple steps:
- Highlight the text you wish to insert a hyperlink into.
- Right-click on the highlighted word or phrase, navigate to Link from the drop-down menu, and hover your cursor over the arrow.
- From here, you will have the option to add a recently used document or to paste your link. To paste your link, click on Insert Link and press Ctrl + V.
- If done correctly, the highlighted phrase should now be coloured blue and have an underline. Your phrase now contains a hyperlink that anyone reading your document can follow.

Tip 6: Changing the proofing language of your document
The proofing language is the dictionary for which Microsoft Word checks for spelling errors. Changing it can be useful for proofreading a document. For example, if you want to change the proofing language of your document to Welsh:
- Navigate to the Review tab on the top taskbar. Highlight the text you would like to change the proofing language of (or press ctrl + A to select the whole document)
- Select Language and then choose Set Proofing Language
- From here you can select the language you wish to change to. For this example, we’ll choose Welsh as the proofing language
- If done correctly, the text should have red underlines indicating a spelling error.

Tip 7: Using Word’s Smart Lookup feature
Smart Lookup is a handy tool that allows users to look up words or phrases within Microsoft Word without having to leave the document. This feature is useful for looking up definitions of unfamiliar words in a document. It can also search for whole sentences which is useful for finding the original source of a sentence. Here’s how it works:
- Highlight the text you would like to search for
- Right-click the highlighted text and select search
- From here, Smart Lookup will search the internet for your chosen text
Want to learn more?
Have we missed something? Check out my LinkedIn Learning collection for more top tips for using Microsoft Word.