DigiTip 44: Make quick decisions in MS Teams with the polling feature 📊 

There may be times when you’re in an MS Teams meeting, and you need to make a quick decision. It could be deciding when to hold your next group meeting or voting on which title to choose for a project report.  

If you need to create a poll once you’ve started your meeting, Teams offers a built-in polling feature. Watch the video below to learn how to set up your first poll. 

Please note: We suggest that you use Vevox, AU’s polling tool, if you’re looking to set up a poll in advance of your online meeting or session. 

To follow our DigiTips, subscribe to our Digital Skills Blog. Or alternatively, you can bookmark this webpage, where a new DigiTip will be added each week!

DigiTip 42: Refine your search results with filters in MS Teams 🔎

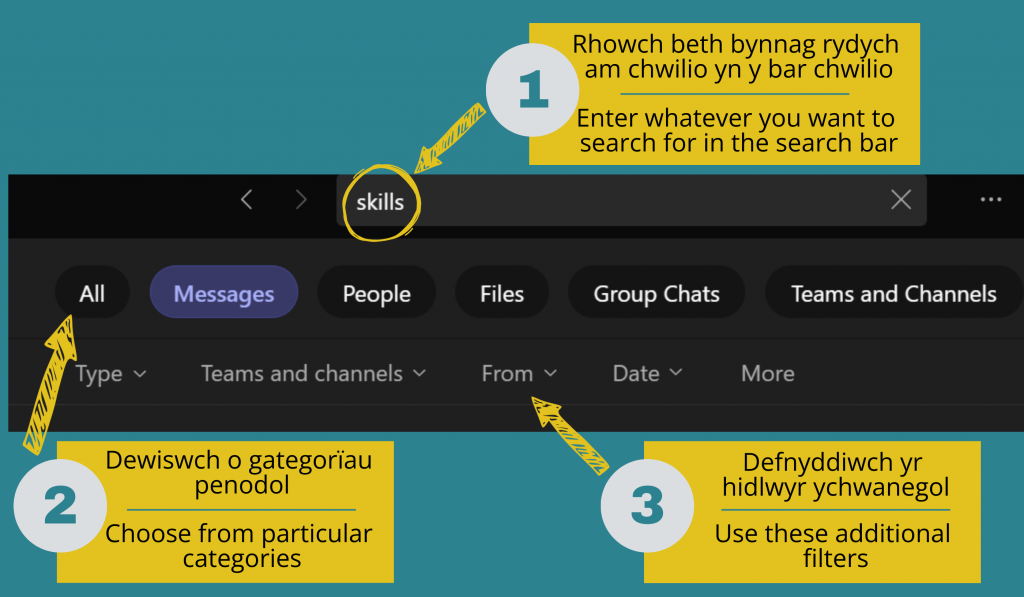
Teams has a useful search function, but it can sometimes produce too many results. To save you unnecessary time searching, you can utilise filters.

These filters allow you to search using specific criteria such as date, sender, and file type, helping you to quickly pinpoint the information you need!

Take a look at the screenshot below to learn how to use these filters ⬇

To follow our DigiTips, subscribe to our Digital Skills Blog. Or alternatively, you can bookmark this webpage, where a new DigiTip will be added each week!

DigiTip 36: Use Outlook reactions to respond to an email 👍🎉

There may be times when someone has sent you an email, and you’d like to acknowledge its receipt without sending another reply. A great feature to use in this case is the reactions feature in Outlook, which works similarly to those in MS Teams or on various social media platforms.

To react to an email, click on the smiley face button on the top of your screen. You can then choose from six emojis, ranging from a thumbs up 👍 to a sad face! 😥

To follow our DigiTips, subscribe to our Digital Skills Blog. Or alternatively, you can bookmark this webpage, where a new DigiTip will be added each week!

DigiTip 34: Make MS Teams chats easier to read with bullet points 💬

Have you ever been in an MS Teams meeting where you’ve needed to send a quick list that’s easy for others to read? There are actually two quick ways to create bullet points or numbered lists in any MS Teams chat.

Option 1

You can either click on the format icon in the chat, and you can easily create bullet points or a numbered list from here.

Option 2

Or, if you’re in a Teams chat:

  • Press and then the space bar to start your bullet points
  • Press 1. and then the space bar to start a numbered list

To follow our DigiTips, subscribe to our Digital Skills Blog. Or alternatively, you can bookmark this webpage, where a new DigiTip will be added each week!

DigiTip 33: Enable live captions in your MS Teams meetings 💬

Here is your final DigiTip for this academic year but you can catch up on all of our previous DigiTIps from this page. We hope that you’ve found our tips useful, and we’ll be back in September ’24 where we’ll continue support your confidence with technology, one DigiTip at a time!

Do you sometimes struggle in larger meetings to know who is currently speaking? …..“was that Ffion or Bethan?!” Maybe you’re working in a loud environment and are struggling to hear others in the meeting speak? Perhaps you’ve joined a meeting where the language spoken isn’t your first language? Or perhaps you appreciate the accessibility of having subtitles?

If any of the above are true for you, then you will likely find the functionality to enable live captions in MS Teams useful. Watch the video below to learn how to enable live captions:

It’s worth noting a couple of things if you’re using this feature:

  • Live captions are only visible to those that have enabled the feature within the meeting, meaning that if you switch them on, they won’t automatically appear for everyone!
  • Live caption data is permanently deleted after a meeting, so no one will have access to this information.

Visit this webpage for further support and guidance in using MS Teams.

Boost your productivity in MS Teams 💡 

Blogpost by Sioned Llywelyn (Digital Skills Lead) 

As someone who uses Microsoft Teams every day for work, I’ve discovered a collection of useful keyboard shortcuts and tips that have helped me in navigating the platform more efficiently. Whether you’re a staff member jumping from one meeting to the next, or a student using MS Teams to collaborate on projects or attend virtual lectures, these tips should help you to make the most of MS Teams. 

Keyboard ShortcutDescription
Ctrl+Shift+O Turn off your camera 
Ctrl+Shift+M Mute your microphone 
Ctrl+K Create shorter hyperlinks 
Shift+Enter Start a new line in the chatbox without sending the message 
Summary of the key keyboard shortcuts mentioned in this blogpost

Turn off your camera quickly

There are times when you need to quickly turn off your video during a call, it may be that your bandwidth is limited or there are distractions behind you. Quickly toggle your camera on and off by using the Ctrl+Shift+O shortcut. 

Customise your hyperlinks

Instead of cluttering your messages with lengthy URLs, make use of the Ctrl+K shortcut. This shortcut allows you to customise the displayed text for your hyperlink, making your messages more concise!

Mute your microphone

Background noise can also disrupt meetings (I have two dogs that bark whenever someone rings the doorbell, so this is my most-used shortcut!) Use Ctrl+Shift+M to mute and unmute your microphone swiftly. 

Refine your search results

Teams has an useful search functionality, but sometimes it can yield too many results! Make the most of the available filters to refine your search and to save you time.

Start a new line in the chatbox without sending your message

Typing messages in Teams can be tricky, especially when you want to add line breaks without sending the incomplete message. Use Shift+Enter to start a new line in the chatbox without sending the message prematurely.

Make quick decisions with the polling feature

Do you need to gather opinions or make decisions quickly? If you’re looking to create a poll once you’ve started your meeting, Teams offers a built-in polling feature.

Please note: We suggest that you use Vevox, AU’s polling tool, if you’re looking to set up a poll in advance of your online meeting or session.

Mark messages as urgent or important

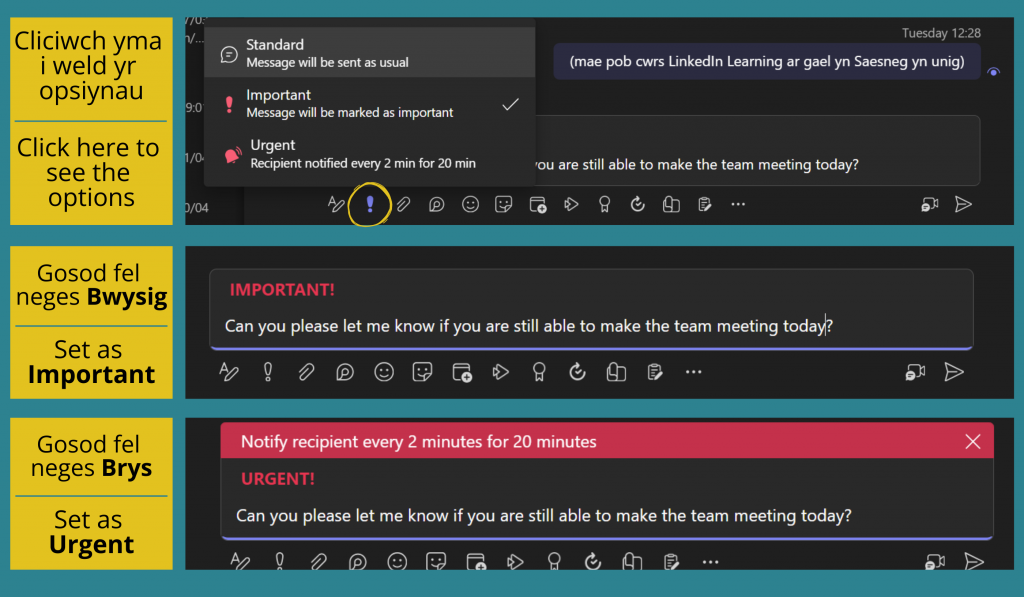
Do you want to send an important message on Teams and are worried that it will get lost within a stream of messages? To solve this issue, you can mark any messages as urgent or important in MS Teams.

Do you have any other shortcuts or other general tips when you’re using MS Teams? If so, we’d love to hear from you! Share your tips and shortcuts in the box below

DigiTip 17: Organise your work with Tasks in Teams ✍

Are you a planner but struggling to be productive? Do you work better with a to-do list, but you want everything in one place? Introducing Microsoft Teams Task by planner!  

You can create your own to-do lists, break these down into daily to-do lists and even view tasks that have been assigned to you in Microsoft Teams channels.  

To create your To Do List: 

  • Go to the Apps icon on the left-hand side of MS Teams 
  • Search for and install the Tasks by Planner and To Do app 
  • At the bottom of the planner, select ‘+ New list or plan’ 
  • Enter any task, select the priority and due date 
  • Once completed select the circle and the task will complete itself 

To break down your to-do list to more achievable goals you can add tasks from your to-do list to “my day” which will refresh every day.   

Watch the video below for a demo on how to use Microsoft Teams Tasks by planner.  

To follow our DigiTips, subscribe to our Digital Skills Blog. Or alternatively, you can bookmark this webpage, where a new DigiTip will be added each week! 

DigiTip 15 – Learn 3 useful functions in Microsoft Teams 💬

Follow these steps to pin your priority chats to the top of your list: 

  • On the left-hand side of your Teams window, place your cursor over the chat you would like to pin 
  • Right-click once on the chat and click on Pin 
  • Your priority chat will be pinned to the top of your recent chat list 

Follow these steps to mute notifications from your chosen chat: 

  • On the left-hand side of your Teams window, place your cursor over the chat you would like to mute 
  • Right-click once on the chat and click on Mute 
  • Incoming notifications will be muted for this specific chat 

Watch the video below or follow these instructions for saving messages to access them later: 

  • Open the chat you would like to save a message(s) from 
  • Right-click once on the message and click on Save this message 
  • Place your cursor your Teams icon and click on it 
  • Select the Saved option on the menu 

To follow our DigiTips, subscribe to our Digital Skills Blog. Or alternatively, you can bookmark this webpage, where a new DigiTip will be added each week! 

DigiTip 10 – Brainstorm new ideas using the whiteboard in MS Teams 💡

Do you need to brainstorm new ideas with your peers for a group assignment? Or perhaps you have a work project that you want to discuss new ideas for with colleagues? The whiteboard in Microsoft Teams is a fantastic tool for this and provides you with a range of templates to choose from.  

Watch the video below to learn how to get started, or please click on this link if you wish to view the below video with closed captions.

We’ll also be showing how to use the whiteboard during our Mastering group work with online tools and strategies session this afternoon (7 November, 15:00-16:00) as part of the Digital Skills Festival! You can join this session directly from the festival programme.

To follow our DigiTips, subscribe to our Digital Skills Blog. Or alternatively, you can bookmark this webpage, where a new DigiTip will be added each week!  

DigiTip 6: Set your status for a set time in MS Teams to show that you’re busy 🔕

Sometimes, you may need to set some time aside to concentrate on a particular piece of work, but how can you show other people who are also online that you’re busy? Microsoft Teams allows you to set your status to Do not disturb, meaning that you won’t be interrupted by Teams notifications or calls (unless you choose to receive these from specific people), but it can be too easy to forget to turn this status off once you’re finished.  

Luckily, Teams allows you to set your status for a set duration. Take a look at the video below or follow these instructions:  

  • Open MS Teams and click on your profile picture 
  • Click on your current status 
  • Select Duration 
  • Choose Do not Disturb (or whichever status you want to appear) 
  • Choose for how long you want this status to appear
  • Click Done 

To follow our DigiTips, subscribe to our Digital Skills Blog. Or alternatively, you can bookmark this webpage, where a new DigiTip will be added each week!