
If you’re like me, having an empty email inbox is both an incredible joy and an insurmountable goal.
Today i’ll share something that helps me feel more in control of my inbox by keeping track of what’s what – what you can delete, keep, respond to, or whatever else you need.
Introducing: Email tagging!
This is a feature in Microsoft’s Outlook program, but it’s also present in lots of other email readers in different forms, so poke around in the settings for yours to see if you can make it work for you.
In Outlook, click these coloured squares under the Home toolbar: ![]()
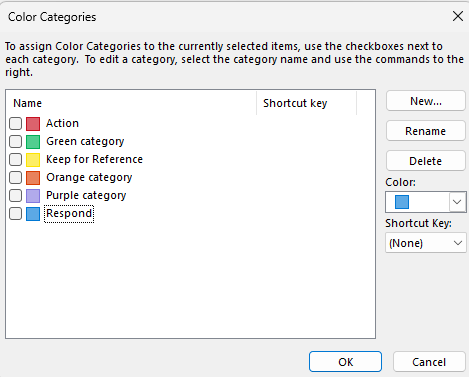
Then, click “All Categories”: ![]()
In this settings menu, you can rename and recolour the tags (or ‘categories’) that you’ll be applying to your emails.
From there, you can select the email you want to tag, then use the dropdown menu accessed by clicking ![]() <- this, and tag your emails as you wish!
<- this, and tag your emails as you wish!
You can also set custom keyboard shortcuts to apply tags, which can speed things up even more once you get used to sorting them.
To demonstrate why you might want to start tagging your emails, here’s an example inbox:
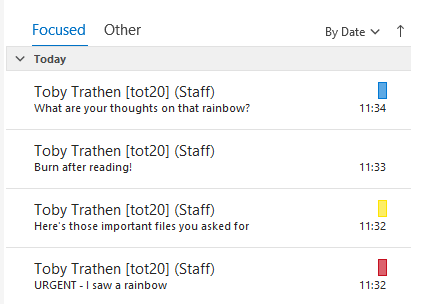
I’ve gone through these emails and quickly tagged them with how I want to deal with them. “Action (red)”, “Keep for reference (yellow)”, “Respond (blue)” and no tag.
Later, when I have the time to write some emails, I can look back through my inbox and sort by categories so I know exactly where each one is supposed to be. It acts as a visual indicator of what emails require further action, which ones are meant to remain in your inbox or archive, and which ones can be safely deleted.
Scaling this up to the hundreds of emails you may receive – some useful, some pointless, some neither – combined with the ability to sort by tags and deal with them all at once, and you may see how this can make managing a busy inbox much less of a daunting task!
To follow our DigiTips, subscribe to our Digital Skills Blog. Or alternatively, you can bookmark this webpage, where a new DigiTip will be added each week!